
Friday, July 13, 2012
Creativity
Here's an end of the year bulletin board I made. I found the original idea on Bulletin Boards to Remember


Kindergarten Collaborative Murals
I saw this idea on a fellow art educators blog, Organized Chaos. There were 6 Kindergarten classes this school year, so I paired 2 classes together and taught this lesson in full, 3 times.
Day 1- Kindergarteners brainstormed the different types of shapes. After focusing on circles and finding examples of circles in the room/real life, students used black tempera paint to draw circles on large bulletin board paper.
I reminded students to make their circles look different! Different sizes, different thickness, different placement, etc. I followed "Organized Chaos's" advice and gave the students only 2 rules. 1. Their circles could not touch. Spread out your work! 2. Do not paint over anyone else's work. Once the rules were set, students rotated around the room to cover the empty papers with circles! After about 10 minutes of circle painting, I changed the rules and had students paint lines to connect the circles. The "rules" still applied. 1. Spread out your lines, and 2. don't paint over anyone else's work.


Day 2- The next day, I had a different Kindergarten class use the circle and line paintings from the day before for the next step. First, as a class the students examined their peers art work. I asked them to identify the shapes that they saw. Circles was the most obvious shape, but I challenged them to look closer. What shapes were created in between the lines?
Next, I passed out cups of paint to each student, making sure that each student had a different color. (I had to do some tint and shade mixing to make the colors stretch!). Each student was assigned a different color. They had to stick with that same color for the whole class. The rules for this class were very similar to the day before. 1. Spread out your color! Don't paint shapes that are right next to each other. 2. Don't paint over anyone else's art work (wet or dry). Once students understood the rules, they used their color of tempera paint to fill in circles and shapes on the murals.


Tuesday, June 5, 2012
My Art
Below is a collection of some of my own paintings I've done in my spare time/college. I thought I'd share my work as well as my students! All of my work is done with oils.

Fruit plate. Oil on Masonite. 2006
This painting is actually 9 different Masonite panels. It's 3 1/2 ft by 3 1/2 ft and currently resides at my parents house in NY.
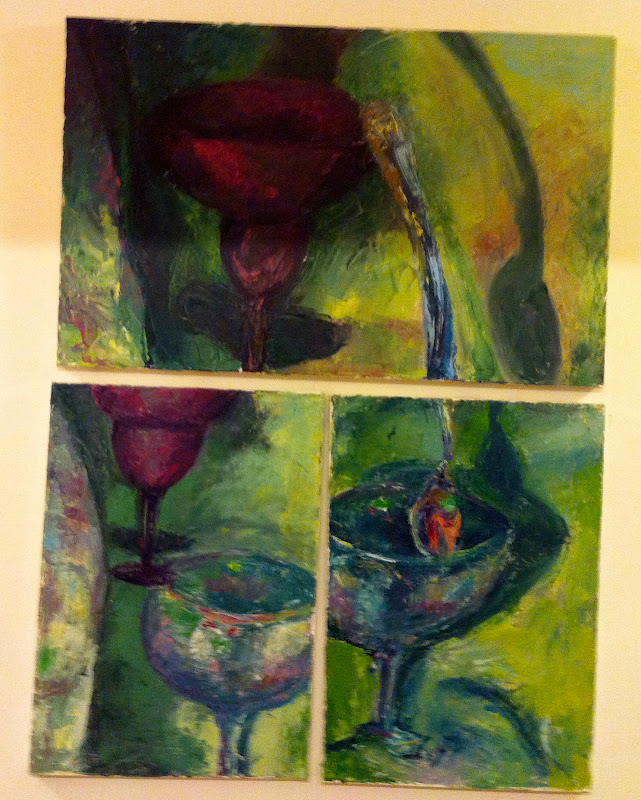
Wine Triptych 2. Oil on Canvas. 2006
The shadow at the top is not there in real life! These are 3 different canvas paintings. I used a pallet knife inside of a brush to paint these.
Below is series of my work in progress.


Countryside. Oil on canvas. 2011
Here's the final product! This is a landscape of Culpeper, VA.

Lamp. Oil on canvas. 2005
This painting can be hung vertical or horizontal.

Niagara Falls. Oil on Canvas. 2005

Wine Dreams. Oil on Canvas. 2006
This is another painting that I did with the pallet knife rather then a brush.

Wine Tryptic. Oil on Canvas. 2004

Colorful Countryside. Oil on Canvas. 2005

Hadley Grace's Tree. Oil on Canvas. 2012
Thursday, May 31, 2012
Kindergarten Self Portraits
Kindergarten students learned about the artist Henri Matisse and his use of pattern in backgrounds.
First, I passed out mirrors so students could see themselves as they drew their self portrait. I demonstrated a few key steps on the board for portrait drawings (head shape, eye, mouth and nose placement, hair, etc). After they were done drawing, they traced their drawing in black sharpie. The next step was coloring! It's important to remind Kindergartners that they don't have blue or green skin....only tan, brown or peach crayons!
For the background students used recycled paper and crayons to create patterns and designs. After the background was complete, students cut out their self-portrait and glued it to their patterned paper.


Wednesday, May 30, 2012
Cherry Blossoms
I found this idea on Pintrest! Awesome website! If you haven't checked it out yet, it's a teachers dream planning board! Originally when I had the students do this project, it was Cherry Blossom Festival time in DC so lots of the kids knew exactly what a cherry blossom tree looked like. First I had them use India Ink and a straw to "blow the ink" to create the branches. Next I set out pink,white and red paint on plates at each table. Students used empty water bottles to print the cherry blossoms on the branches.
Check out second grade's cherry blossoms below!


Check out second grade's cherry blossoms below!


Big Fat Hens
I have done this lesson before, but it was such a hit, I had to do it again!
To check out the original post click here.


Adobe Landscapes
I borrowed this idea from Deep Space Sparkle. To introduce the lesson, I showed students 2 pictures of landscapes. They worked in groups to answer a collaborative group discussion sheet about the two pictures. Students had to decipher the similarities, differences, age of the pictures and locations using group discussion. After students had time to talk about the art they saw, I taught them how to create an Adobe landscape of their own! We used chalk and oil pastels for this project.


Subscribe to:
Posts (Atom)